How to Join Granny Squares: Easy Zigzag Slip Stitch Guide
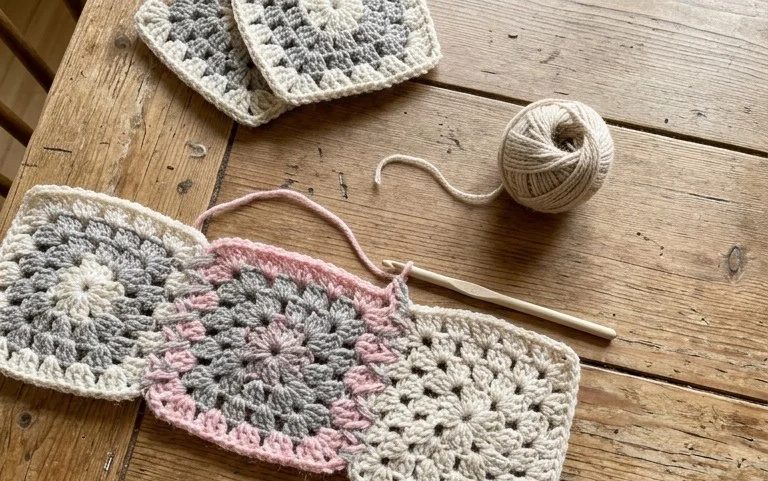
Joining individual crochet squares often feels like the most tedious part of a project, yet the zigzag slip stitch method transforms this chore into a decorative feature. This technique creates a raised, chain-like texture between your motifs that adds structural strength while providing a soft, intentional border. It is a fantastic choice for those working on baby blankets or scrap-busting afghans who want a clean finish without the bulk of heavy seams. You will find that this method lies flat, keeps your edges aligned, and saves significant time compared to traditional sewing, allowing you to enjoy the final assembly process thoroughly.
Why You’ll Love This Pattern
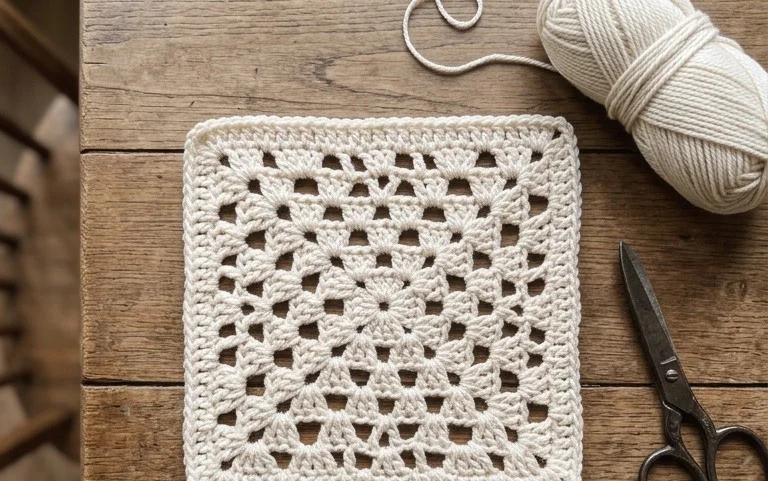
The Classic Crochet Granny Square is the foundation of many heirloom blankets and is remarkably efficient for using up leftover yarn scraps from previous projects. Because it relies on a repetitive sequence of stitches, you can reach a meditative rhythm quickly, making it a reliable project for relaxing at the end of a busy day. It works up in a small, portable size, allowing you to carry your hook and yarn with you to finish a round during a short break. Once you master the join-as-you-go technique, you can assemble entire throws without sewing dozens of individual motifs together at the end.
I finally learned how to make these squares after struggling with other patterns, and the instructions for the corners made it so clear how to keep the square flat without curling.
— Sarah, hobbyist maker
Pattern Overview & Skill Level
- Skill Level: Beginner
- Approximate Time: 30 minutes per square
- Construction: Worked in joined rounds, starting from the center and expanding outward
- Finished Dimensions: Approximately 5 inches by 5 inches using medium weight yarn
Materials & Supplies Needed
- Yarn: Worsted weight #4, 100% acrylic or wool blend, approximately 20 yards per square.
- Hook Size: 5.0 mm / H-8
- Notions: Tapestry needle for weaving ends, sharp scissors.
- Yarn Substitutions: Cotton yarn will produce a stiffer, more defined square, while acrylic will result in a softer, more drapable fabric. Using a lighter weight yarn like DK #3 will result in a smaller square unless the hook size is adjusted downward.
Stitch Guide & Abbreviations (US Terms)
- ch = chain
- st = stitch
- sl st = slip stitch
- dc = double crochet
- sc = single crochet
- ch-sp = chain space created by previous chains
- cluster = a group of 3 dc worked into the same space
Step-by-Step Pattern Instructions
The classic granny square is built by creating a center hole and adding clusters of stitches in rounds.
Granny Square Body
- Round 1: Start with a magic ring. Ch 3 (counts as first dc), work 2 dc into ring, ch 2, *3 dc into ring, ch 2; repeat from * twice more. Join with a sl st to top of starting ch-3. (12 dc, 4 ch-2 spaces)
- Round 2: Sl st into the next two stitches and into the corner ch-2 space. Ch 3, 2 dc, ch 2, 3 dc all in same ch-2 space. *Ch 1, (3 dc, ch 2, 3 dc) in next corner ch-2 space; repeat from * twice more. Ch 1, join with sl st to top of starting ch-3. (24 dc, 4 ch-2 spaces, 4 ch-1 spaces)
- Round 3: Sl st into the next two stitches and into the corner ch-2 space. Ch 3, 2 dc, ch 2, 3 dc all in same corner. *Ch 1, 3 dc in next ch-1 space, ch 1, (3 dc, ch 2, 3 dc) in next corner; repeat from * twice more. Ch 1, 3 dc in last ch-1 space, ch 1, join with sl st to top of starting ch-3. (36 dc, 4 ch-2 spaces, 8 ch-1 spaces)
- Round 4: Sl st into the next two stitches and into the corner ch-2 space. Ch 3, 2 dc, ch 2, 3 dc all in same corner. *(Ch 1, 3 dc in next ch-1 space) across side until the next corner, ch 1, (3 dc, ch 2, 3 dc) in corner. Repeat around, ending with a sl st to top of starting ch-3. Fasten off. (48 dc, 4 ch-2 spaces, 12 ch-1 spaces)
Care & Washing Instructions
- Hand wash your finished item in cool water using a mild wool-safe detergent.
- Gently squeeze out excess water with a clean towel and lay flat on a drying rack away from direct heat or sunlight.
- Block the square by pinning it to the correct dimensions on a foam mat while damp to ensure perfectly straight edges.
Pro Tips & Common Mistakes to Avoid
- Keep your tension even by ensuring your fingers maintain consistent contact with the yarn; if your squares are curling, you may be working your stitches too tightly.
- Place a stitch marker in the top of your starting ch-3 to easily identify the join point at the end of the round.
- Weave your yarn tails in multiple directions through the back loops of the stitches to ensure they do not pull out after repeated washing.
- Adjust the size of the square by simply adding more rounds following the same pattern repeat, but note that larger squares will require significantly more yarn.
Frequently Asked Questions
Can I use a different hook size with this pattern?
Yes, changing your hook size is a common way to adjust the gauge. A smaller hook will result in a denser, smaller square, while a larger hook will make the square larger and more open.
Is this pattern suitable for complete beginners?
Yes, this is an ideal starter project because it only requires chains, slip stitches, and double crochets, which are the most fundamental skills in crochet.
What is the best way to join these squares together?
You can use a whip stitch with a tapestry needle for a hidden seam, or use a slip stitch join through the back loops for a decorative, raised ridge effect.
Can I sell the items I make from this pattern?
Standard industry practice allows you to sell handmade items from your own labor; however, please check the specific terms of the designer if you are using a unique or copyrighted pattern source.
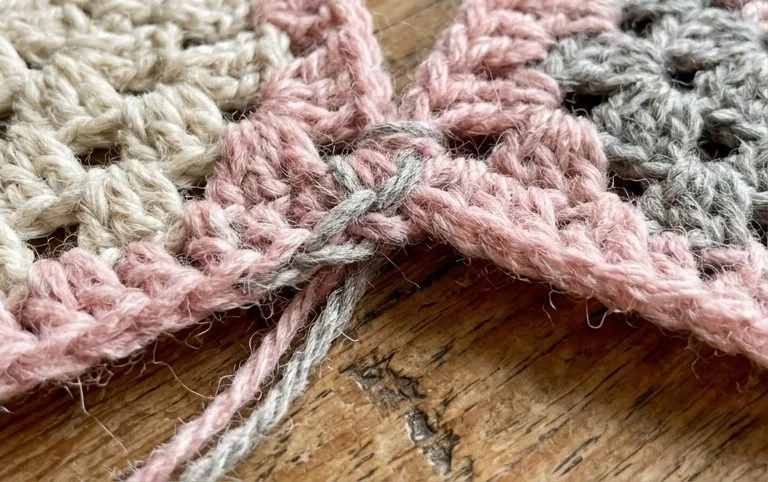
Your finished blanket will have a beautifully textured, professional seam that holds up well through years of regular use and washing. For a bolder look, try using a contrasting yarn color for your joining thread to make the zigzag pattern pop against the squares. When you finish your project, please post a photo of your work so others can see your color choices. You can find more free patterns and tutorials on our blog to help you plan your next handmade gift or seasonal home project.